Thursday 12 June 2014

Moved In!

Just in time for our four year anniversary, we have moved in to our tiny dwelling. But wait-it doesn't feel so tiny! Somehow we have manifested a trick of the mind, perhaps due to great design, that makes it feel spacious and absolutely wonderful. After two years a lot has been made, but of course there is more to do.

There will be window trim, with dark and tight-grained cedar, drawers and their respective drawer fronts, book shelves, a deck, and a tiny outhouse -these are a few things that still need doing. But hey, after the crazy summer of money generating the fall is a great time to build.

Not only are we moved in, but we actually moved the whole home as well. Not far, perhaps 300 feet. We had a backhoe and a one tonne truck help us along. The backhoe had to transplant a baby fir tree and rip up some stumps that were in the way. It then pivoted the caravan into position so that the truck could hook it up. And away we went...very sturdy and little to none accidental rubbing of the tires which we had good reason to be worried about -with only a centimetre clearance in the sketchiest of places!

I find it hard to express how happy we are with the result. We own it, debt free.

I hope you all have your own wonderful projects percolating along...I will try to get photos up.

Best Wishes,
  Bailey and Scott.

Sunday 16 December 2012

A Long Overdue Update, With Results.

Long Time, No Update.

So, it's been almost a month since we have posted a blog update.  Sorry to keep anyone in suspense.
We have misplaced our camera, and ended up missing the chance to document a good number of the steps that have taken us to where we are today.  This next section will be lacking in detailed how-to details for now.  We can elaborate further upon request.

The roofing went up in a less than a day. Scott and Tim got all 14 sheets up before lunch, then finished off the ridge cap soon afterwards.   Tim stood up on the rafters/strapping in his "spider man vibrams" while Scott handed the roofing sheets (3'x7') up to him.  We used a 1/4" hex-head bit on the impact driver and installed the sheets using roofing screws with rubber gaskets.  This part was pretty straight forward and went without much of a hitch.

Our roof.  No more sweating those late night rainy windstorms.
We had originally intended to have painted the exterior before winter set in, but we bought oil-based paint right as it the weather was becoming to wet and cold.  So, we decided to put up a temporary layer of builder's paper to protect our exterior plywood.  We pre-cut the lengths for the end pieces, then pulled them tight and held them down with 2" wide battens made from strips of plywood.  These screwed into the studs behind the edges of the plywood sheets.

Skip a few steps, and viola! "Death Star mode" activated.

Once we had our new outer husk in place it was time to cut install the windows.  So many details.  We cut out the plywood using a flush-cuting dremel tool.  Builder's paper went all around the inner opening, Tuck Tape to seal the edges.  The windows went in over two days.  We did the first three pre-framed windows one day, then installed the handsome wooden awning windows that Bailey built the frames for.  These were a little more involved to install, but they went in surprisingly quickly.

Starting to look rather nice, we think.
Now it's time for a little break.  A trip to the mainland to visit family for the holidays, and a little time away from our labour of love.  Now we have a roof to protect it from the elements for many years to come.  Our gable ends are still open for the moment, and we have delayed installing the doorframe and door to avoid damaging them while working on the interior.  But otherwise we are practically at lockup, which feels like a major accomplishment.  

Our little propane cookstove, a recent score.

Lots of light.
The window on the right will have a fold-down table under it.
Our sink will be below this window.
The door has a full-length inset window.

So, there you have it for now.  Hopefully we didn't leave out too much for those itching for all of the technical details (haha).  Thanks so much for visiting.

More updates to come, after our holiday hiatus.  Plus maybe a spell to regenerate some funds.

All the best,
  Bailey & Scott


Monday 19 November 2012

Things begin to take shape.

Strapping and fascia boards up. Exterior plywood cut and fitted.

With our rafters all in place and our soffit blocks installed, the next step was to put up the strapping and fascia board to complete the structural elements of the roof.  Strapping acts as a skeletal structure underneath the metal roofing and also gives some substance for the roofing screws to bite into.  We used 1x4s on 18" centres, running laterally the whole length of the roof.  We treated the exposed ends with LifeTime.  We also had to add some more pieces of 1x4 atop the rafters capping the end walls, between the rows of strapping.  These pieces filled the gaps below the roofing sheets and above the end rafters. 
Here you can see two rows of strapping, as well as a "finger block" (darker brown).
The piece with the cutout at the bottom of the photo sits atop the gable end rafter.
We also had to make what I will name "finger blocks." These are illustrated above, and serve to fill the little gaps between the soffit blocks.  We also treated these with LifeTime.  The basic idea is to not have big openings for rodents or other unwanted pests to enter the insulated cavity below our roof.  Next, we added the horizontal fascia boards, which also received LifeTime treatment.  These attach to the bottom ends of the rafters and run laterally.  They will sit behind the gutters once they are installed.  

Plumber's Hanger used to reinforce framing.
Large Xs provide extra shear strength.

Another process we did at this stage was to add some structural reinforcement to our framing.  Traditional framing focuses its strength vertically, working to resist gravity, but doesn't provide much resistance against shear (diagonal) stresses.  The plywood for our exterior sheathing will provide significant shear strength to our structure,  but we wanted to give it a bit more strength to resist the strains of transport.  We used standard Plumber's Hanger (PH, essentially metal ribbon with holes every 1/2" or so) stretched across the framing in large Xs, avoiding the openings for windows, and nailing it to each stud or plate it overlapped.  We did this on the exterior face of the framing, so as to not get in our way when we install wiring, insulation, etc.  (Be sure to use flat-headed nails to attach the PH.  If you use screws or other fasteners with a high profile head this will cause troubles down the road when you attach your exterior sheathing.)  The more elements of your structure that any given length of plumber's hanger ties together, the better.  We also nailed several small L-shaped pieces of PH around each corner to further tie our framing sections together.

You can make your own skill saw guide
by screwing a length of 2x4 on top of your sheet of ply.
Now for the tricky part, measuring and cutting the plywood for the exterior sheathing.  Thankfully, we had use of a skillsaw guide to help make the long, straight cuts running the length of our sheets.  This is a metal guide with an adjustable clamp that attaches to a piece of plywood, acting as a rule or cutting guide.  If you don't have access to a guide you can make your own by simply screwing a 2x4 onto the piece of ply to be cut.  Be sure to measure the distance from the blade to the edge of your skillsaw's built-in edge guide, and adjust accordingly.  Our saw has 25/16" gap between the blade and guide edge, so we had to subtract 25/16" from each measurement when we placed our clamp-on saw guide.
 
Our decision to have sloping walls meant that our plywood pieces were a bit more complicated than they would have been if our walls were all plumb (straight up and down).  

First we measured and cut the short plumb strips covering the floor joists.  We did these in 4 foot widths, so our edges would line up with the larger sheets sitting above them covering the sloped part of the wall.  We screwed the bottom row pieces in place with 2 1/2" screws.  Above these ran the tall (nearly 7 feet long) wall sections, reaching from the floor up to the lower edge of the rafters.  These we fitted and installed one at a time, making sure to snug up the edges so they fit tightly in place.  

We did the sloping sides of the caravan first, then measured up the short ends.  We started in the middle of the short ends and worked outwards so we could trace where the backside of the "wing" pieces overlapped the sloping walls.  (Photos below.)


Here you can see the door step-out
and "wing" plywood in position.
Cut from one piece:
Door step-out (left) and "wing" of short wall (right).

Now all of our plywood has been cut and fitted.  But we're not through yet.  We still have to install a line of flashing along the bottom edge of the sloping walls, and there's much painting to be done.  We had discussed the idea of painting the sheets of plywood before we put them up, but we didn't have our paint yet, and were eager to continue making progress while we had cooperative weather and time available to us.  So now it looks like we'll likely just paint it as is.

Our roofing order should arrive tomorrow, and we plan to head into town on Thursday to pick it up.  We hope to have it up and installed soon after.

Furthermore, today Bailey finished building frames for the three wooden double-paned window sashes that we got for a song from Demxx.  Yeehaw!

It has been really exciting to have our patrons, friends and land-share partners drop in on our worksite, and to have our first sit-down conversations inside our burgeoning home.  

A big thank-you to all of our friends, family and community members who have helped us out thus far.  We certainly wouldn't be at this stage in the process if it was just the two of us stumbling through things.  For those of you who might be considering embarking on a similar project, don't forget that the people around you can offer a wealth of support, advice, and encouragement.  

We are so excited to see our home come together, and eager to get our roofing installed, and our door and windows too!


Thursday 8 November 2012

A Little More Progress: Rafters and Soffits

8 November 2012 -- A Little More Progress: Rafters and Soffits

Enjoying a break from the rain.
After a productive stint that saw our framing completed and installed in place, it was time to throw up the rest of the rafters and install the vented soffit blocks that sit nestled between the rafters, atop the stud walls.  

We used our trusty radial-arm mitre saw to mass-produce twenty identical rafters with cut-out birds-mouth joints (illustrated here), plus two pairs of end rafters without birds-mouths.  These end rafters will be fully exposed as the fascia board above our gables, so we took the time to sand them nice and smooth.  We fashioned the rafters from 2x6 lumber to allow plenty of space for insulation, spaced on 24" centres to minimize weight and material cost.

Scott uses an orbital sander on the end rafters, which will end up on display.
We also made about two dozen of what I will call "vertical soffit blocks."  Soffits are vented areas underneath a roof overhang, and are generally found in a horizontal plane.  Our design will be a slight twist on this idea, but the basic idea is the same, a screened vent to allow the roofing insulation to breath, while keeping out unwanted pests.  We used 2x6 lumber again, and bored sets of three 1.5" holes, measured against a template.  A boring job for sure, but Tim was quick to jump to the task while Bailey jittered away on the orbital sander and Scott applied a preserving treatment to our freshly-made pieces.  

Once our rafters and soffits were cut, and the appropriate sanding completed, it was time to treat the wood that would be exposed on the out-/underside of the roof (fascia board, exposed rafter ends, soffits).  We used a product that used to be called LifeTime, now "Eco Wood Treatment" (website here), made on Salt Spring Island.  It comes as a powder that you stir into water. 'Non-toxic', blah blah blah.  It cost us about $20 to mix up one batch of 4.5L, which is enough to treat approx. 150 sq. ft. according to the label.  This treatment prevents moulding/mildew and causes the wood to age a silvery colour, much like exposed cedar.  We used a paintbrush for application and coated the exposed ends of our rafters, as well as the outside faces of the soffit blocks.  We decided it would be wise to treat the pieces on the ground, rather than after we had installed them nearly ten feet above grade.  

Note the two empty hurricane clips visible on the ridge line,
waiting for their rafters to be installed. 
We installed H1 hurricane clips on our ridge line before installing the rafters.  These are little metal clips similar to joist hangers.  They have holes for roofing nails and attach the rafters to the ridge line.  We will also use a row of hurricane clips at the bottoms of the rafters, where they cross the top plate of our stud wall.  As the name suggests, they fasten the bottom edge of your roof to the top edge of your walls, so that if a huge gust of wind comes along your roof doesn't rip open like a can of soup.  We're not particularly paranoid about hurricanes, but the clips will help to secure everything together and resist any movement of the walls or rafters.

By the end of the day we had our rafters up and our heavy-duty tarp secured over top of everything to keep out the rain.  Boy did that feel good!

More work to come this week, so stay tuned and we'll keep you updated on our progress.

Thanks again!
  Bailey & Scott


Monday 5 November 2012

The Walls, They are Up!

Four walls up, and end rafters in place.
Update: November 5.    WALLS!

After a significant lull in our production schedule (making time for some very wet and windy weather and Halloween celebrations that echoed over nearly a week) we managed to get back on task and put some real time in on our project.

Our friend Tim's expertise and assistance has been integral to our quick progress in this last week.   Tim was the perfect person to help us on this project, having built his own custom caravan.  In fact, the designs for our caravans are quite similar, the main difference being that he used curved logs for his roof supports.

Once we had our floor platform completed, the next step was to begin framing up the sections of our walls.  We did our long walls in three separate sections, in order to accommodate the wheel wells, and to avoid having to lift long heavy sections.  We had decided on the placement and height of our windows while determining our floor plan.  Lots of measuring and cutting ensued.  Luckily, Tim is old hat at that game, and we did about half of the framing in one day.  Another short day of work saw us complete a good deal more framing, and having most of the cuts prepared for the next day's work.

Framing for kitchen end-wall.
The diagonal brace held it solid and square until put in place.
Installing wall above wheel well.
Today we were blessed with beautiful sunny weather, which allowed us to get in a full day's work.  Once all of the wall sections were assembled it was time to build and attach the gable ends (that's the upper part of the end walls that sticks up to cover the gap under the roof).  Now we put the wall sections in place one at a time, beginning with the built-out section for the door, which stood upright on its own.  Next came the adjacent short-end wall.  The sections went up surprisingly fast once we had them all fabricated.  Now it was time to attach the double plate, a continuous line of 2x4s running along the top of the wall edge.  This ties the whole structure together and supports and distributes the weight of the roof coming down off the rafters.

Coming together.

The whole time we were assembling the wall sections we had giant grins on our faces.  This was it, the walls were going up.  Our imaginings were finally beginning to take shape and define the outlines of our new home.  Now, we realize there is still an incredible amount of work to go until we're at lockup, not to mention all the finishing work that will follow.  But that said, it feels like we're coming along at a healthy pace, and within a week or so we can have our rafters up and tin roof installed.  Now if only we could agree on a colour....

Our Hero: Tim installs the double plate.
Tip of the Week: One of your most important resources is your tool belt.  Get in the habit of wearing it, and training yourself to return your tools (pencil, tape measure, speed square, hammer....) to your belt immediately so that you don't walk away to another area of your worksite only to realize you left your tape measure at your chop saw.  I have wasted countless minutes walking back and forth, looking around for my pencil.

Thanks to all the people who have taken the time to read our blog and share it with others who might find it interesting or inspiring.  We have been inspired by our friends, who have shown us it's possible to build yourself a modest home at a reasonable price.

Hurray for life without a mortgage!  

With love,
  Bailey and Scott.

Friday 12 October 2012

Step by Step


Out of the way, (and in the sun), I start my construction blog.
A Caravan on Hornby.
  It's fall 2012.  We are building our caravan on the farm where it is intended to live.  For those new to caravans, they are small homes on wheels -- almost like a build-it-yourself RV.  First, we will build by the barn/power outlet, then we will move the caravan into the woods near the camping area, where wwoofers and farm-hands stay.  We all help Elaine on the farm.  

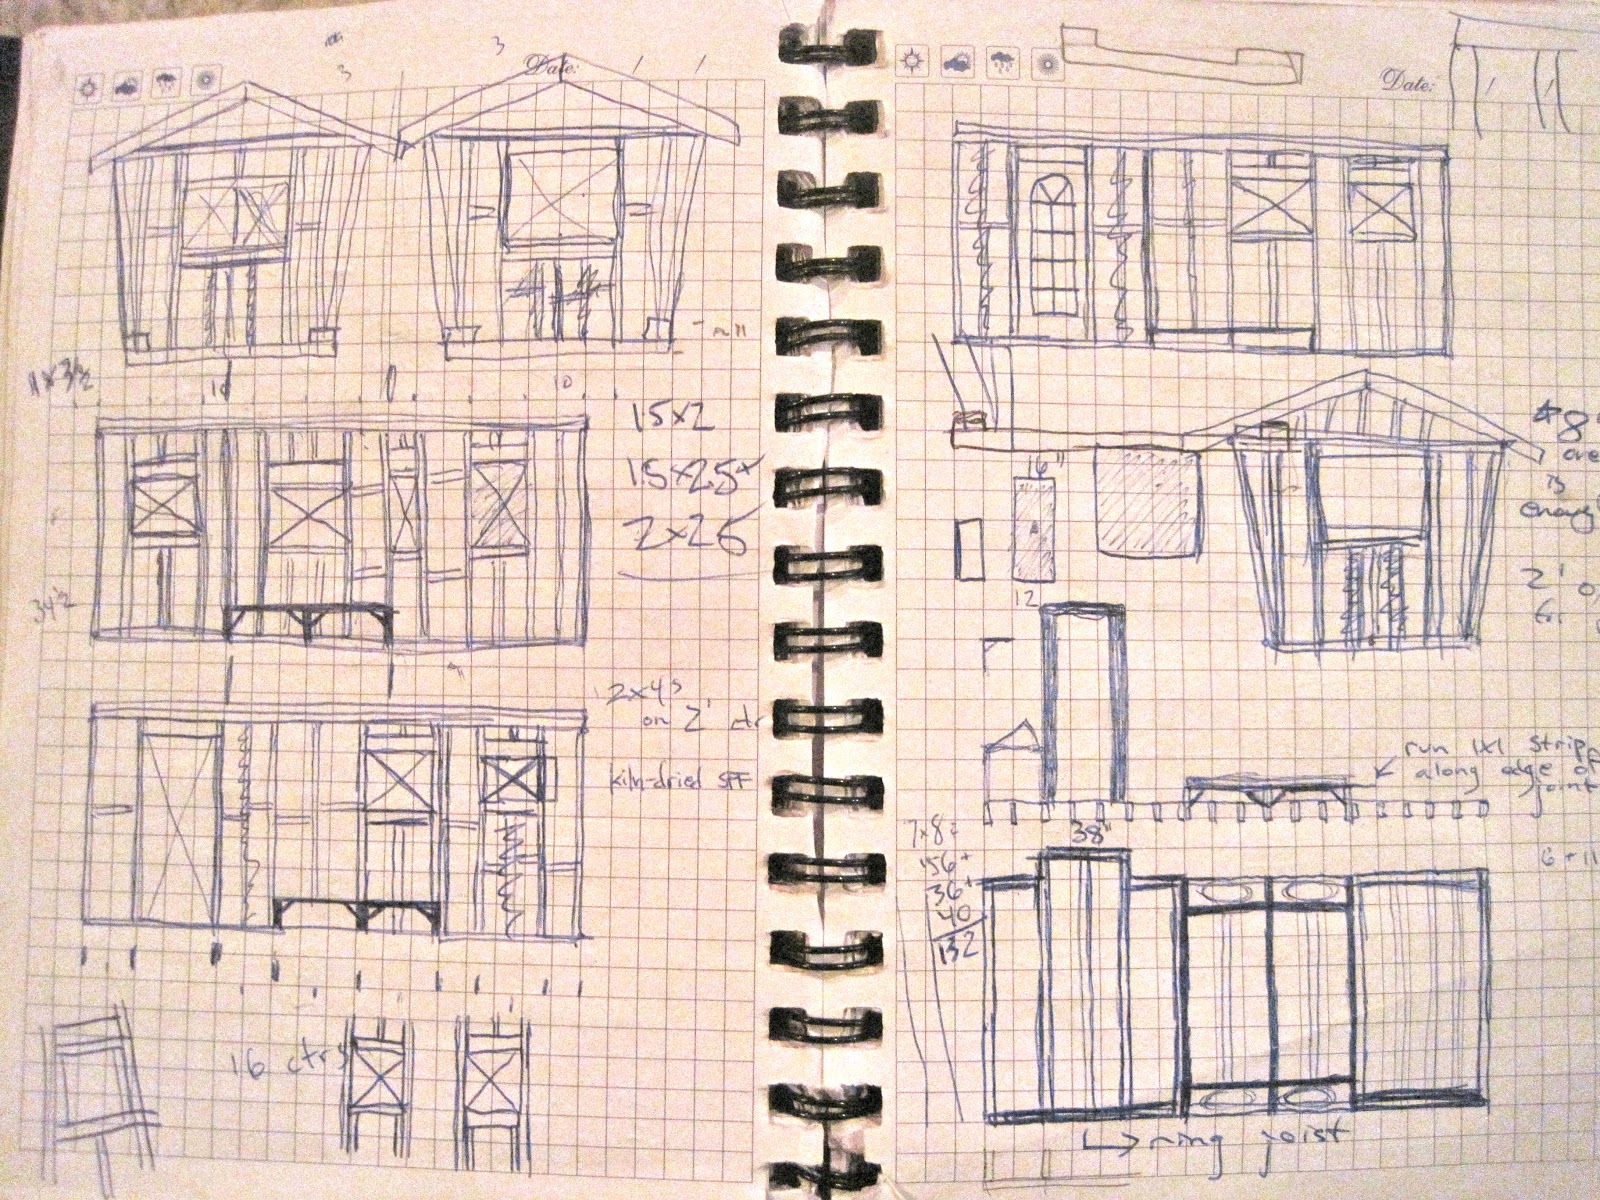
Once we had our trailer, Scott took detailed notes
 of its specific dimensions.
He uses graph paper with a scale of 5 squares = 1 inch.
Then he makes one square equal one foot for floor plans, etc. 
Part of the back story is that my partner Scott wanted to buy a boat and be a live-aboard, since that lifestyle made sense and spoke to him, in a way. There was a boat up for sale and Scott thought long and hard about whether to buy it. After thinking it through, it seemed that we would be more comfortable, being a pair, to live in a bigger space, on land. Caravan it was, a whole whopping <200 sq, ft.


Having a frame is a good place to start (we used an old metal/wood construction RV trailer). It's hard to finalize any plans without knowing your trailer's specific dimensions first. We bought a trailer from our friend for $100. He had worked in trade to own it and demo-ed the inside, together the three of us took down the remaining walls. When demo-ing we were harassed by some wasp-esqe flies living in the walls which was an obstacle. I even got stung, possibly by the queen? Or is that just bees?

When looking for a caravan look for a frame that is fairly rust free.  Our frame is C-shaped channel bar, consisting primarily of two long supports with some flimsy cross bracing. The tongue gets attached to a heavy duty pickup truck, when it needs to be moved. We hack-sawed off the old metal stairs and used a grinder to cut off the rusty bumper. There was considerable rust on the rest of the frame, so we scoured it off with a wire brush and steel wool, then used nail polish remover as a solvent and wiped the surfaces down with a rag before brushing on a layer of black Tremclad "rust proof" paint.


Plan, plan, plan.
It's easiest to experiment and make your mistakes/discoveries on paper.

Whether you buy an already made caravan design, or you create it yourself, (probably with some good consulting advice from a friend), the plan is the next step. For us, the drawing process started in December, mostly working on the interior floor plan. We ruled out an upstairs sleeping loft early on, as we didn't want to deal with it's ups and downs.

Make a cut list and buy materials. Tarp materials.

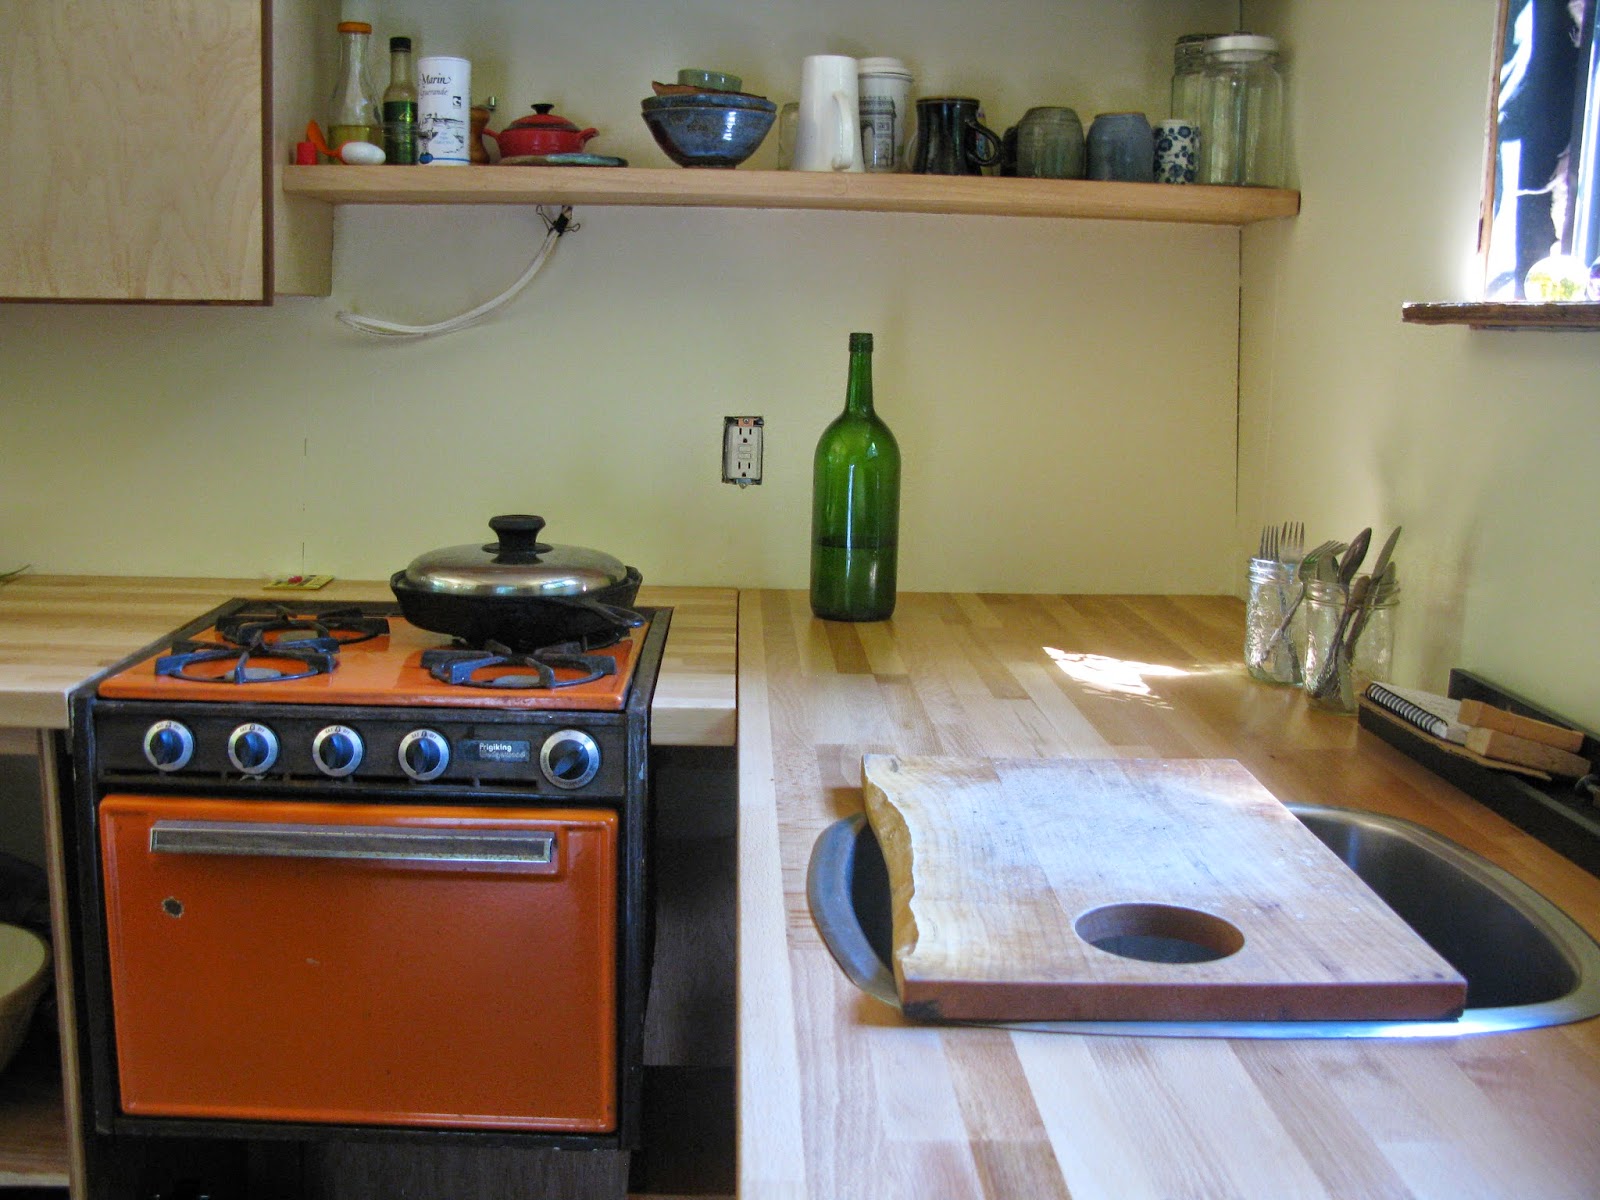
We managed to get our windows (and sink, fridge, and woodstove), second hand. They don't all match and I look forward to seeing how it looks. Knowing the windownsize and placements is crucial before framing the walls. Wall thickness denoted insulation type (we went with good ol' fiberglass Pink stuff. It's lighter and cheaper than the otherwise awesome Roxul, which provides more R value.)

Our materials arrived on a Tuesday. Seeing almost 2 grand arrive in it's new form of construction materials, (wood, ply, insulation, hardware cloth, vapour barrier, glue, bolts, skill saw) was exciting. So was seeing our new chop saw set up atop freshly made sawhorses.  Since we had a fairly big order we got a discount at the store.  Delivery cost approx. $100 from Vancouver Island to Hornby.

Before your materials arrive it's important to map out where the building site will be, where the materials will be stored, and if you have some level ground to work with in between. For level ground, we worked on top of our piles of ply until we had a floor to work upon.  Make sure to tarp your hard-earned materials and keep them off the ground.  Ours came on skids and/or pallets.


Level the frame. Because there was no weight on our trailer we didn't need to use a jack, we just build supporting stacks from scraps of wood and shims. 


One of three floor joist sections.  Note: supporting stacks & vent holes in the blocking. 
Vent holes on rodent barrier plywood.
This is before we fastened it beneath the joists. 
“It's pretty tiring being our own bosses, so we work about 2-5 hr days.”

It took three days to build the three floor sections. I don't know why it took so long, (we did short days), but when you're not used to construction things can move quite slowly. We had to backtrack and move some of the floor joists and blocking to line up with the edges of our ply, once we had that cut.

Sometimes the blocking was staggered to allow for screwing into the end-grain, but I also took to toe-screwing, down on an angle from one piece to another. This allows for a continual blocking row around several floor joists.

Now, we used decking/project screws for our floor joists which we later questioned the shear strength of, so we added a nail or two in the centre of the two existing screws. Nails have better shear strength than screws but are able to come loose if your structure is to be moved.

Our floor is 2x6 construction on 2 foot centres.  Fibreglass insulation will fill the spaces between the joists.  We have added a layer of plywood below the floor joists, to deter rodents and insects from nesting in the insulation.  To ventilate this underfloor area we drilled 1.5 inch holes through the plywood and stapled metal mesh and screen over the holes.   We also put some holes in the blocking to increase ventilation.


Tuesday we put tar roofing shingles between the metal frame and the underside of the floor platform.  Otherwise, condensation on the frame would transfer to the wood and cause rot.  We need to build wheel-wells because the tires sit above floor level.  To do this we are building up three of our 2x6 floor joists by scabbing 2x10s on top of them.  We are leaving the 2x10s an extra 2 inches in length to allow for us to cut an angle to match the walls.  I look forward to this step as it will be among the early finishing touches.  And then I dream of colours, of exterior paint...  Something bright and cheery.  I don't want to blend into the forest.  For the interior, we've decided on a light and dark green.  

Our work-site is a minefield of cow patties and sappy stumps.  Right now, I'm perched on the ply, watching sawdust float my way, illuminated by the sunlight.  This is not optimal on any day, but today I feel a cold in my throat.  I don't usually take a sick day for the common cold, since they hit me a few times a year, instead choosing to persevere.  

Scott often uses our floor platform as a support for cutting with the skill saw.  One of his favourite tips is to make sure your building site lends itself to easy feeding.  Whether you pack a lunch or stop at a restaurant, keeping your blood sugar up helps your coworkers stay happy with you.  And don't forget to stay hydrated.  My tip: avoid cheap drill bits, they're not worth it.
Clamping hardware pre-assembled.
Scott spent hours on the drill press, manufacturing custom brackets and clamping plates to attach the floor joists to the trailer frame.  We went with a method that would allow us to avoid drilling through the metal of the trailer frame, and also avoid drilling through the vertical profile of the floor joist, which we decided would weaken it unnecessarily.  It's rather difficult to explain the whole setup with just words.  Observe the photos.  


Vertical bolts pass on either side of trailer frame.
Horizontal bolts pass through floor joist and clamping plate.
Top view: clamping plate (hidden)  has head side
of bolts passing through on bottom of photo.
From below: bolts pass through plate, washer, locking washer. Nut.
Once we had manufactured all the appropriate parts, the next step was to take them on-site and fit them on the assembled floor sections.  We then drilled through the bottom ply to allow the bolts to pass below on either side of the frame.  Once every thing was in place, we bolted the whole works down and tightened all our brackets and clamps.  

The next step was to measure and cut the 5/8 tongue and groove plywood to make the subfloor that would sit atop the floor joists (eventually laminate flooring will go above this -- we scored just enough at the free store).
Be sure to wear gloves if you're working with fibreglass insulation.
That stuff itches like the Dickens!
Then it was time to measure and cut the insulation to size to fit between the floor joists.  In the areas where our joists were set on proper 24 inch centres this went very smoothly.  In other areas, we had to measure and cut to fit, which went pretty smoothly.  We used our little shop vac to clean out the sawdust and pine needles from each section before adding the insulation.  We did a dry fit of the plywood and marked out the joists with a chalk line so we would know where to put the screws to hold down the plywood.  
Bailey getting caulky. 
Then we used construction adhesive on the exposed tops of the floor joists and blocking, carefully placing the plywood on top and lining up the edges.  Once it was all set in place, we used 2 inch screws every six inches to fasten it down.  The tongues and grooves were a bit of a trick to line up properly, but we used a hammer to nudge the sheets into place, employing a "banger block" to help protect the fragile grooves on the edge of the plywood. 

The floor was comprised of five sheets of plywood.  Once we were ready to go it only took us a few hours to have the whole floor insulated and top plywood secured.  It took exactly one batt of insulation (precut to 2x6 on 24 inch centres) to insulate our floor.  How fortuitous!

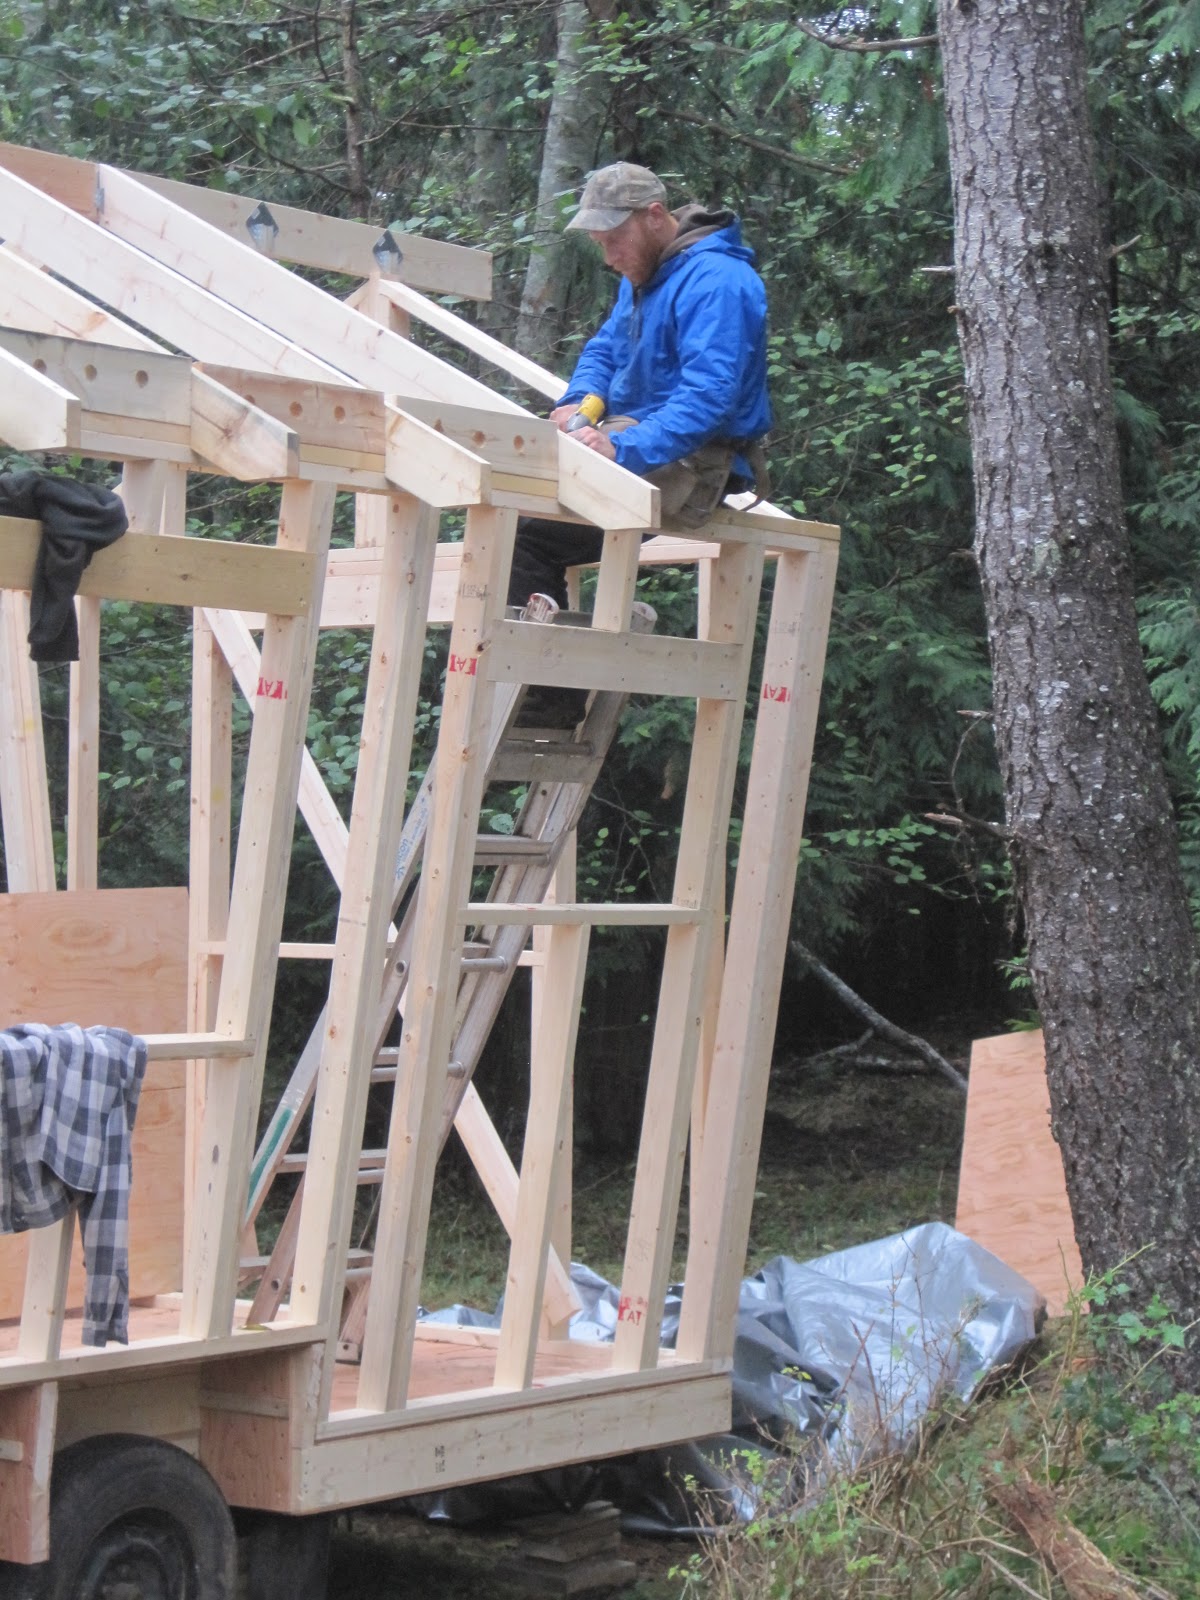
It's taken us a lot longer to get to this point than we had originally anticipated, but we are excited to get moving on the next chapter: Framing the Walls.  More news on our progress as it happens.  
 
The finished floor platform.
Thanks for reading!  Please post any comments or questions.
 
  <3 Bailey & Scott